
FxSound J-POP Vocal Clarity Settings
If the vocals get buried behind the instruments when listening to J-POP, or if the overall sound feels muffled, you can try adjusting the FxSound EQ settings slightly. This article is for those who have completed the basic installation and initial setup, and it explains how to fine-tune the sound in FxSound with a focus on vocals.
If concepts like output device, preset, and master gain are still unfamiliar to you, first 7 Tips for Setting Up FxSound for the First Time It's best to read the article first. In this article, we will focus on J-POP vocal adjustment, explaining separately the cases where low frequencies overpower the voice and where high frequencies sound tiring.
Hanip Summary
| Problem situation | Area to check first | Adjustment direction |
|---|---|---|
| The vocals are pushed back. | 125Hz-250Hz, 2kHz-4kHz | Slightly reduce the mid-bass and slightly enhance the vocal presence. |
| The sound is muffled. | 125Hz~250Hz, 500Hz~1kHz | Clean up the thick low end without overly cutting the vocal body. |
| The vocals are thin. | 500Hz~1kHz | Maintain the mid-range naturally without lowering it too much. |
| High notes are tiring | 8kHz and above | If sibilance bothers you more than airiness, slightly lower the treble. |
Why vocals get lost in J-POP

J-POP often centers on vocal melodies, but many songs feature synths, guitars, pianos, bass, drums, and choruses densely layered behind them. Because of this, even a slight excess in the low frequencies can make it sound like it's buried behind the instruments.
Especially in fast songs, the kick and bass are constantly moving, and synth and cymbal sounds come along in the high frequencies. At this time, if the mid-low range is bloated or the high frequencies are too strong, the overall pressure can be felt more than the clarity of the vocals.
Situations where vocals get buried
- Earphones or headphones with a lot of bass: The bass and kick can push forward, relatively pushing other sounds back.
- Small speaker: The actual bass doesn't come out deep, and only the mid-bass is bloated, which can sound stuffy.
- Equipment with strong treble: At first, it's clear, but after listening for a long time, the sibilance and electronic sounds in the vocals can be tiring.
- Music App EQ Duplicate Application: If multiple corrections overlap, the sound may be excessively compressed or muddy.
Basic principles for adjusting vocal clarity
If you want to make it sound better, just raising the treble in FxSound might not sound natural. Voices are made by the combination of bass, mid-range, upper-midrange, and treble, so changing just one area significantly can make it sound thin or sharp.
In FxSound settings, it's best to start by reducing the bass that masks the vocals, then check the mid-range where the vocals are centered, and finally, slightly boost the clarity range. It's safer to make small adjustments and listen to the same section repeatedly.
Changes to listen to by frequency
- 125Hz~250Hz: It affects the thickness and dullness of the low frequencies. If there's too much, the area around the vocals can feel stuffy.
- 500Hz~1kHz: This creates the body of the vocal line and the core of the instrumental arrangement. If you cut it back too much, the voice may sound thin.
- 2kHz~4kHz: It affects the presence of your voice and the clarity of your pronunciation. If you raise it slightly, your voice may sound more prominent.
- 8 kHz or higher: These are the areas of airiness, high frequencies, and sibilance. Too much of these can be tiring on the ears.
Why Vocals Sound Muffled When There's Too Much Bass
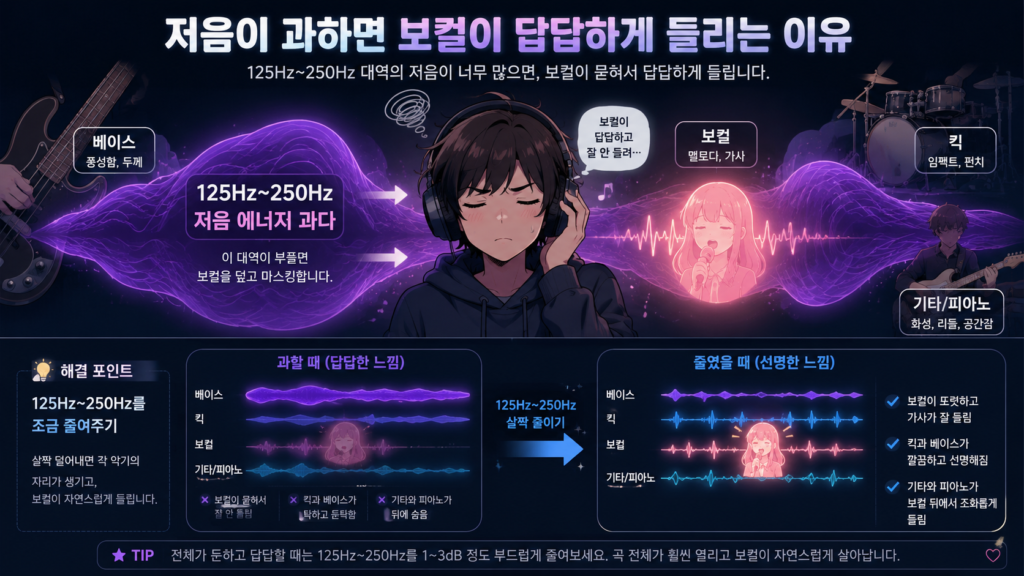
If the bass is rich, the music may initially sound more powerful. However, in J-POP, if the frequencies around 125 Hz to 250 Hz are too prominent, the bass and drums can overwhelm the vocals, causing them to sound muffled.
This range creates warmth and thickness, but when it is raised too much, the entire song can feel dull. Especially in band sounds or fast synth pop, the rhythm needs to feel light and lively, but if the low-mid range lingers too long, the chorus can sound stuffy.
How it feels when you reduce 125Hz to 250Hz
- The muddy feeling around the voice may be reduced.
- The kick and bass may sound a little shorter and cleaner.
- Guitars and piano may sound less clumped together behind the vocals.
- If you cut it back too much, the music may sound thin and hollow.
For this section, it’s better to “trim it back just a little” rather than cutting it down drastically. Instead of immediately turning the bass way down because the low end sounds muddy, it’s better to reduce it one notch at a time until you find the point where it comes alive naturally.
500Hz~1kHz is the range that creates the body of vocals
If you cut too much from the midrange in an effort to make your voice sound clearer, it can actually make your voice sound thinner. This is because the frequency range around 500 Hz to 1 kHz is related to the body of the vocals, the core of the instrument, and the warmth of the song.
If there’s too much of this range, it can feel stifling, but if there’s too little, the voice sounds distant and weak. Especially with male vocals or songs by singer-songwriters with a low tone, if this range is lacking, the song’s core can feel insubstantial.
Adjustment criteria for 500 Hz to 1 kHz
- When your voice is thin: Check to make sure you haven't cut this area too much.
- When it feels like the sound is coming from inside a box: I'll reduce it just a little bit to see if it's still too tight.
- When the guitar and piano sound a little empty: It's best not to lower the midrange too much.
- When a male vocalist sounds distant: Before boosting the 2 kHz to 4 kHz range, I first check the midrange.
In FxSound settings, the midrange is more important than you might think. Before boosting the mid-high frequencies just to make the sound clearer, listen first to see if the vocal foundation is solid enough.
Why Adjusting the 2 kHz–4 kHz Range Brings Vocals to Life
The 2 kHz to 4 kHz range is related to the perception of vocals coming to the forefront. It can make the pronunciation sound clearer, or make the voice—which was previously hidden behind the instruments—sound a little closer.
However, even a slight increase in this parameter can make a noticeable difference. If you boost it too much, the sound may come across as shrill, or the guitar and synths may stand out too sharply.
Tips for Adjusting 2 kHz–4 kHz
- If the vocals are getting lost, start by slightly reducing the frequencies between 125 Hz and 250 Hz, and then make further adjustments.
- Don't increase the amount all at once; test it in small increments.
- Changes may be more noticeable in female vocals.
- In band songs with multiple guitars, be careful because the vocals and guitars may clash.
When adjusting J-POP vocals, you may notice the effects of this setting quite quickly. However, it’s important to make sure the sound doesn’t become tiring after prolonged listening.
Boosting frequencies above 8 kHz too much can cause fatigue.
Frequencies above 8 kHz are associated with airiness, sparkle, cymbal sounds, and sibilance in vocals. Opening them up slightly can make the sound feel less muffled, but overdoing it can cause a piercing, fatiguing sensation in the ears.
This range feels even more pronounced when listening to J-POP through earbuds. If you’re already using a product with crisp high frequencies, you might find it more comfortable to lower this range slightly rather than boosting it.
When you feel vocal fatigue from singing high notes
- I'll lower the 8 kHz to 16 kHz range slightly.
- If you've increased the sharpness, reduce it by one level.
- We compare whether a sense of space or surround sound effects make high frequencies sound sharper.
- I also check to see if it feels more comfortable when I turn the volume down.
At first, the setting with more high frequencies may sound clearer. However, for extended listening sessions, a less fatiguing setting is often a better choice.
Beginner vocal setup example
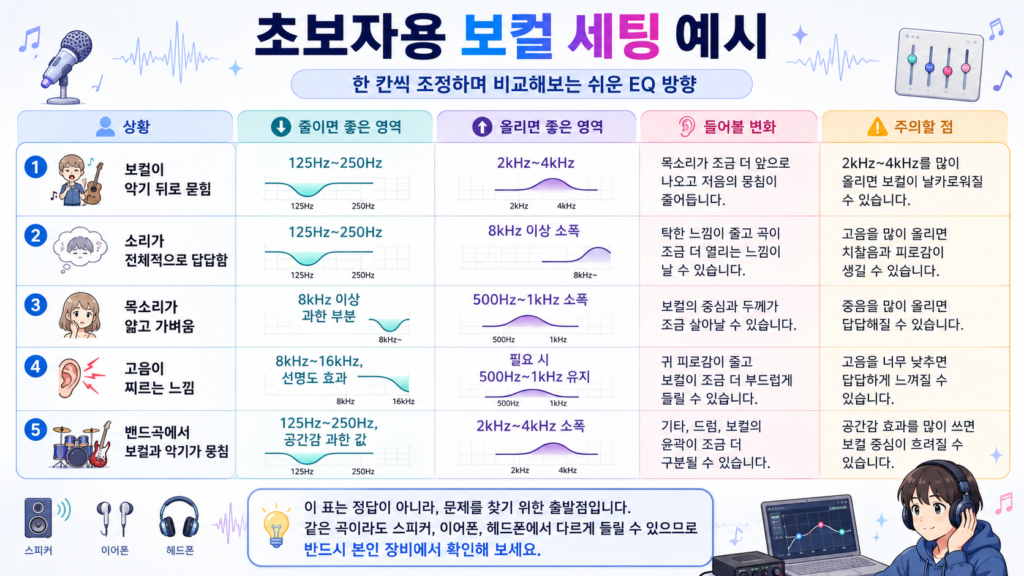
The values below serve as a starting point for reference. Since the sound may vary depending on your device, audio source, volume, and personal preferences, try adjusting them one step at a time and comparing the results rather than setting them to a fixed value.
| Situation | Areas to Reduce | Areas to Increase | Changes to Consider | Points to Note |
|---|---|---|---|---|
| Vocals are buried behind the instruments | 125Hz~250Hz | 2 kHz to 4 kHz | his brings the vocals slightly more to the forefront and reduces muddiness in the low frequencies. | If you boost the 2 kHz–4 kHz range too much, the vocals may sound harsh. |
| The sound is generally muffled | 125Hz~250Hz | A slight increase at 8 kHz and above | It may sound less muddy and the song may feel a little more open. | If you sing too many high notes, it can lead to sibilance and vocal fatigue. |
| A thin, light voice | Excessive levels above 8 kHz | 500 Hz to 1 kHz, narrow band | This may help bring out the vocal's center and body a bit more. | If you boost the midrange too much, the sound can become muffled. |
| A piercing sensation in the high notes | 8 kHz–16 kHz, Clarity Effect | Maintain 500 Hz to 1 kHz as needed | It may reduce ear fatigue and make the vocals sound a little smoother. | If you lower the treble too much, it may sound muffled. |
| The vocals and instruments blend together in a band song | 125 Hz–250 Hz, excessive sense of space | 2 kHz–4 kHz, slight | The guitar, drums, and vocals might be a little more distinct. | If you use too many spatial effects, the focus on the vocals may be lost. |
This table is not a “definitive answer” for making vocals sound better, but rather a starting point for identifying issues. Even the same song can sound different on speakers, earbuds, and headphones, so you must check it on your own equipment.
How to set up vocals on speakers
Speakers are greatly affected by the room's layout and placement. In particular, small desktop speakers or laptop speakers often fail to produce deep bass, yet their mid-low frequencies can sound bloated, making vocals sound muffled.
- If you've placed the speaker too close to the wall, try moving it slightly.
- If there's a humming sound between 125 Hz and 250 Hz, try lowering the setting one step at a time.
- Do not cut the 500 Hz to 1 kHz range too much for the vocal body.
- I boost the 2 kHz to 4 kHz range very slightly to check the presence of the voice.
- Start with a low spatial effect, and reduce it as the vocals move farther away.
With speakers, placement often has a greater impact than EQ. If the sound still sounds muffled after you’ve moved them, try adjusting the mid-low frequencies a bit using a free equalizer.
How to adjust vocal settings on earphones
Because sound enters directly into the ear with earbuds, high frequencies and sibilant sounds can be perceived more sharply. If you boost the high frequencies too much in an effort to make the vocals sound clearer, you may quickly become fatigued.
- First, check the size of the ear tips and how deeply they fit.
- If there's too much bass, try reducing the 125 Hz to 250 Hz range slightly.
- If the vocals sound thin, don't cut the 500 Hz to 1 kHz range too much.
- Adjust the 2 kHz to 4 kHz range only by a very small amount.
- If frequencies above 8 kHz are tiring to your ears, reduce the treble and clarity.
Even small changes can feel significant when listening through earphones. Rather than making drastic changes all at once, it’s better to listen to the same chorus section repeatedly and make adjustments little by little.
Official Product Information Check
When choosing earphones, it’s a good idea to check the manufacturer’s official product information in addition to the Coupang product page.
- View the official product information for the Sennheiser IE 200
- View the official product information for the Sony WF-1000XM5
How to set up vocals on headphones
While headphones may feel more spacious than earbuds, depending on the model, the bass may sound too heavy or the vocals may sound slightly distant. In particular, with closed-back models, J-POP vocals can sound muffled if there’s a lot of mid-to-low frequency.
- If the bass is too heavy, reduce the 125 Hz to 250 Hz range slightly.
- If the vocals sound too distant, try boosting the 2 kHz–4 kHz range slightly.
- If you add too much reverb, the voice can get lost in the mix, so I start with a lower level.
- Check to see if frequencies above 8 kHz cause fatigue during extended listening sessions.
- The same settings may feel different depending on whether the device is open-back or closed-back.
It's important to test headphones at the volume you normally listen to. A setting that sounds good at low volumes may cause high-frequency fatigue at higher volumes.
Official Product Information Check
When comparing products, it’s a good idea to check not only the product pages but also the manufacturer’s official product information. On the official website, you can find more accurate details on product specifications, included components, supported features, and connectivity options.
- View the official product information for the Sennheiser HD 560S
- View the official product information for the Sony WH-1000XM5
Reasons for changes in settings across music with different vocal tendencies

YOASOBI, Ado, and Kenshi Yonezu are all frequently mentioned in the context of J-POP, but their vocal styles and arrangements are quite different. Therefore, even if you apply the same music playback settings, the listening experience may vary.
- YOASOBI: You should make sure that the combination of their clear vocals and synths doesn’t cause fatigue from the high notes.
- Ado: Due to its powerful vocals and raw delivery, it’s best not to boost the 2 kHz–4 kHz and 8 kHz+ ranges too much.
- Kenshi Yonezu: Since his music centers on his low voice and unique arrangements, cutting too much from the 500 Hz to 1 kHz range could weaken the core of his vocals.
In other words, it’s difficult to adjust the vocal settings to suit every song with a single value. A more practical approach is to select two or three songs by an artist you listen to frequently and find an average setting that sounds comfortable across those songs.
Vocal Burial Checklist
- Check to see if the music app's built-in EQ is turned on.
- Check to see if there's too much bass boost or dynamic effects.
- Check to make sure the 125 Hz–250 Hz range isn't too high.
- I check to see if the body of the vocals has disappeared after cutting the 500 Hz to 1 kHz range too much.
- Check to see if the voice sounds more natural after making a slight adjustment to the 2 kHz–4 kHz range.
- After boosting the frequencies above 8 kHz, I listen to see if it causes ear fatigue.
- Check to see if you have saved separate presets for speakers, earbuds, and headphones.
- We compare the same section of the same song with the sound on and off.
If you try to change everything on the checklist at once, it’s hard to tell which item made a difference. It’s best to change one item at a time and listen to the same section repeatedly for about 10 to 20 seconds.
6 J-POP Songs Great for Testing After Setup
When checking vocal settings, it’s a good idea to choose songs where the vocals and the arrangement are relatively distinct. The songs listed below—mostly released since 2020—are good examples for comparing how well female vocals, male vocals, and vocals set against a band or electronic backdrop stand out.
| Purpose of the Test | Song | Key Points to Listen For |
|---|---|---|
| Female Vocal Clarity | Yorushika – "Left-Right Blindness" | heck to make sure the vocals don't sound too thin or shrill against the accompaniment. |
| Female Vocal Clarity | Aimyon – "Heart" | Listen to see if the richness of her voice blends naturally with the guitar accompaniment. |
| Male Vocal Clarity | Macaroni Pencil (マカロニえんぴつ) – Love, People, Hearts (恋人ごっこ) | Check to make sure the male vocals don't sound too thin. |
| Male Vocal Clarity | Yuuri – Dry Flower (ドライフラワー) | Check to see if the rough texture of the voice and the mid-range come through naturally. |
| Vocal Clarity in Band/Electronic Music | Zutto Mayonaka de Ii no ni. – "Zanki" | Check to make sure the vocals aren't drowned out by the fast rhythm and electronic sounds. |
| Vocal Clarity in Band/Electronic Music | Green-Yellow Society – Mela! | Listen to see if the band’s sound and the vocals blend into a single mass during the chorus. |
When testing, instead of listening to the entire song at once, try playing short sections on repeat—such as parts with vocals, the chorus, and sections with a lot of overlapping instruments. It’s a good idea to check whether the vocals sound more natural than before the adjustments, while also making sure your ears don’t get tired.
Mistakes to avoid when calibrating for the first time
- Raising only the high notes to make your voice stand out: ven if it seems clearer, listening to it for a long time can be tiring.
- Lowering all the low frequencies: While this may bring out the vocals, it can sap the music of its energy.
- Excessive midrange cut: This can cause the body of the vocal sound to disappear, making it sound thin and distant.
- Add a lot of surround sound effects: This makes the space feel larger, but it can blur the focus on the vocals.
- Save it with a specific song in mind: It may sound too bright or too muffled when played with other songs.
A good vocal setup isn't just about making the vocals stand out. It's more about finding a balance where the vocals are clearer, but the guitar, piano, synth, and drums still come through naturally.
Frequently Asked Questions
When a J-POP vocal track gets buried, what should I adjust first?
First, it’s a good idea to check whether the frequencies around 125 Hz to 250 Hz are too prominent. If the mid-low frequencies are drowning out the vocals, simply reducing this range a little can make the vocals sound more natural.
To make the vocals sound clearer, should I boost the 2 kHz to 4 kHz range?
This can be helpful, but it's best to adjust it only slightly. This setting affects the presence of the vocals, but if you boost it too much, the vocals and guitar may sound harsh.
Should I reduce the 500 Hz to 1 kHz range?
This isn't an area you should always cut. Since this part affects the body of the vocals and the center of the instrumental mix, cutting it too much can make the voice sound thin and distant.
The high frequencies sounded muffled, so I boosted the frequencies above 8 kHz, but now my ears feel tired. Why is that?
At frequencies above 8 kHz, along with a sense of airiness, the sharp elements of sibilance, cymbals, and electronic sounds may also become more prominent. If you find that the sound is causing more fatigue than clarity, it’s a good idea to lower this frequency range slightly and reduce the clarity effect as well.
Can I use the same vocal settings for both speakers and earphones?
It's possible, but I don't recommend it. Speakers are affected by the room and their placement, and since sound enters your ears directly with earphones, the same settings may sound different. It's best to save separate presets for each device.
Can I use the same settings for a powerful vocalist like Ado?
For tracks with strong vocals, it’s best not to boost the 2 kHz–4 kHz and 8 kHz+ ranges too much. If the vocals are already prominent in the mix, it may be enough to just clean up the mid-low frequencies a bit.
How can I tell if things have improved after the setup?
Compare the same section of the same song with the feature turned on and off. If the vocals sound clearer without the bass dropping off too much and without increasing fatigue from the high frequencies, this setting may be a good fit for your device.