
Key Things to Know When Choosing an FxSound Preset for the First Time
This article is a beginner’s guide for music listeners who have installed FxSound but do not know which setting to choose first. An FxSound preset is a starting point that lets you change the sound quickly, so it is easier to understand the program by choosing one basic setting and adjusting only the parts that feel uncomfortable.
The same setting can sound different depending on your earphones, headphones, speakers, audio source, and playback volume. We will look at a simple process: decide whether you want to change the vocals, bass, treble, or spaciousness; compare the same section of the same song at a similar volume; and then save the result as a custom preset.
| Selection Criteria | What to Check First | Adjustment direction | Points to Note |
|---|---|---|---|
| Desired change | Decide whether the problem is related to vocals, bass, treble, or spaciousness. | Choose one FxSound preset as a reference point and adjust only what is necessary. | Avoid making large changes to several effects and EQ bands at the same time. |
| Playback device | Check your earphones, headphones, speakers, and the actual output device. | Compare the same setting again whenever you change devices. | Bass and spatial effects may feel stronger on closed-back devices. |
| Music genre | Separate vocal-focused music, bands, dance, hip-hop, and acoustic music. | Check whether the main sound of the genre is easy to hear. | Do not make large adjustments based only on the genre name. |
| Comparison method | Use the same song, the same section, and a similar playback volume. | Change one item, then compare it with the effect turned on and off. | Do not mistake an increase in volume for clearer sound. |
| Saving method | Include the device, genre, and adjustment purpose in the name. | Save the result as a separate custom preset. | Keep it under a new name before overwriting the basic setting. |
What Is an FxSound Preset?
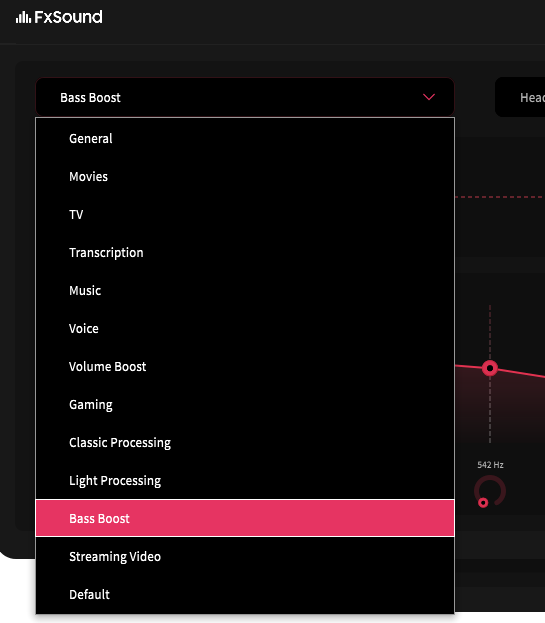
An FxSound preset is a group of settings that loads EQ bands and the Clarity, Ambience, Surround Sound, Dynamic Boost, and Bass Boost values at once. It helps you quickly compare a particular sound direction without moving every slider from the beginning.
A preset is closer to a tool for choosing a starting point than a correct answer for sound quality. Even when you do not like the result, you can keep the overall setting and adjust only the uncomfortable part among the vocals, bass, treble, and spaciousness.
The Difference Between Basic Presets and Custom Presets
The current official guide lists General, Music, Voice, Streaming Video, Gaming, Classic Processing, Light Processing, and Bass Boost as the basic options. The screen layout may vary depending on the installed version and language setting, so check the names that actually appear on your PC first.
The basic options are prepared as starting settings for a wide range of environments, while custom presets store values adjusted for your own device and preferences. If a change indicator appears next to the preset name after you edit an FxSound preset, you can understand it as a sign that the values differ from the original setting.
Custom preset names are easier to find when written in the order “device-genre-purpose.” For example, names such as “Earphones-Vocals-Soft,” “Headphones-Rock-Bass Cleanup,” or “Speakers-Dance-Low Spatial Effect” make similar settings easier to distinguish as your list grows.
Why Choose a Preset Before Adjusting the Details?
Using an FxSound preset as a reference point makes it easier to identify what caused the sound to change. If you change the EQ bands and all five effects from the beginning, it becomes difficult to tell whether clearer vocals came from a midrange adjustment or a change in Clarity.
For music listening, you can begin by comparing broadly useful options such as Music, General, and Light Processing with the same song. If you choose Bass Boost to check the bass character, also listen for whether the resonance becomes excessive on small speakers or closed-back earphones.
If selecting the output device or turning the program on and off still feels unfamiliar, it is better to read 7 Tips for Setting Up FxSound for the First Time. The cause of the sound problem may be the Windows output device or the playback program’s own EQ rather than the tone settings.
5 Ways to Choose FxSound Presets
1. Decide Which Change You Want First, Such as Vocals, Bass, or Spaciousness
Before selecting an FxSound preset, write down only one thing that feels uncomfortable in the current sound. Check whether the vocals move behind the instruments, the bass booms, the treble feels piercing, or the space spreads too widely. This quickly narrows down the available choices.
A specific goal such as “move the vocals slightly forward,” “reduce the resonance after the kick,” or “make the left-right width more natural” is better than a broad goal such as “better sound.” When you have one goal, it is also easier to decide whether the change improved the sound or should be reversed.
Start by listening to Music or General. If the change feels too strong, compare Light Processing. Keep the test section unchanged, because changing both the preset and the song makes the difference harder to judge.
2. Check Whether You Are Using Earphones, Headphones, or Speakers
The same FxSound preset can create a different impression of bass and spaciousness when the output device changes. In-ear earphones and closed-back headphones may make low frequencies and sound effects feel stronger because they sit close to the ears. Speakers are also affected by room size and distance from the wall.
Small laptop speakers and portable speakers may not reproduce very low bass sufficiently. If you continue raising the low bands and Bass Boost on these devices, vibration, muddiness, or distortion may appear before deeper bass does.
Be careful about applying a custom preset made for earphones directly to speakers, or using a speaker preset on earphones. After changing devices, replay the same song and check the vocal position, bass resonance, and left-right width from the beginning.
3. Start with a Basic Direction That Suits the Music Genre
An FxSound preset is not a fixed answer that should be applied according to the genre name. It works better as a reference for finding the central element of a song. For vocal pop, listen to vocal presence. For band music, check the overlap between guitars and vocals. For dance pop, focus on the power of the kick and bass.
The current official basic list may not include detailed genre names such as Pop, Rock, or Hip-Hop. In that case, start with Music or Light Processing and adjust only one band or effect needed for the genre.
Recordings and arrangements can differ even within the same genre. If there is a large difference between a calm band song and an instrument-heavy rock song, it is practical to divide custom presets by purpose with names such as “Band-Calm” and “Band-Busy Chorus.”
4. Adjust One EQ Band or Effect at a Time
After choosing an FxSound preset, move only one EQ band or one effect slider. Begin with a small change, listen to the same section again, and then keep or reverse it. This makes it easier to identify which item affected the sound.
EQ directly raises or lowers the amount of a particular frequency range. As a reference, 31 to 63 Hz affects sub-bass and rumble, 125 to 250 Hz affects bass thickness and muddiness, 500 Hz to 1 kHz affects the body of vocals and instruments, 2 to 4 kHz affects vocal presence, and 8 to 16 kHz affects treble and sibilance.
Effect sliders can influence tone, space, and perceived loudness across a wider area than a single EQ band. Instead of heavily raising EQ and effects together, first find the uncomfortable frequency range and add a related effect only when necessary.
5. Compare with the Same Song and Save the Result as a Custom Preset
When comparing FxSound presets, repeat about 20 to 40 seconds of a familiar song. Choose a section with a clear purpose, such as where the vocal begins, where the kick and bass play together, or where the chorus becomes instrument-heavy.
If the volume differs before and after the setting change, the louder version can easily feel clearer and more powerful. In particular, after changing Dynamic Boost, match the perceived volume of Windows and the player as closely as possible before listening again. This makes it easier to judge the actual tonal difference.
If you like the result, save it as a new custom preset. Instead of repeatedly overwriting the same values whenever the device or genre changes, keep separate names. This makes it easier to return to the original state or compare two settings.
The Difference Between FxSound Presets, EQ, and Effect Sliders
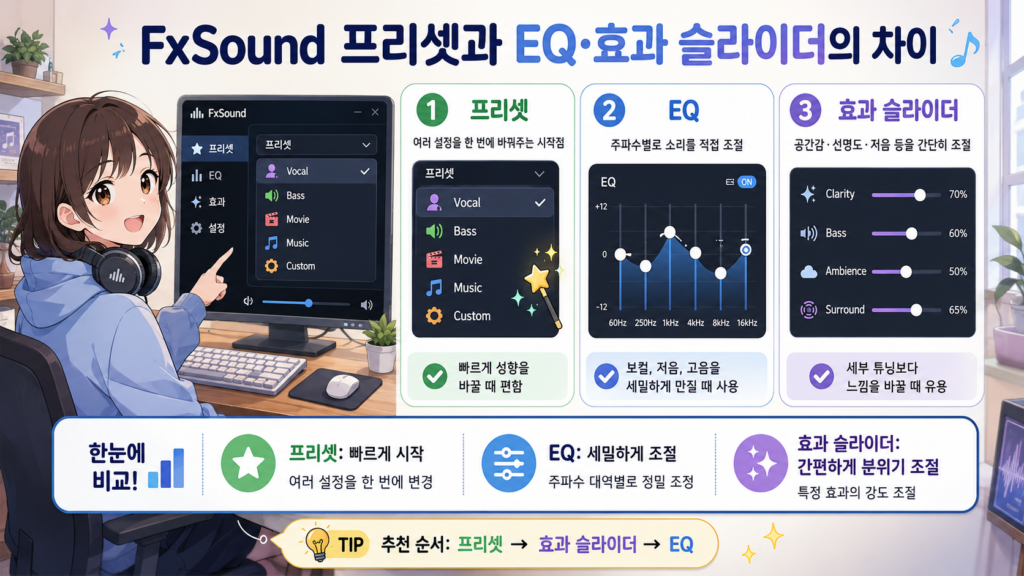
The current FxSound music-adjustment screen lets you look at EQ together with Clarity, Ambience, Surround Sound, Dynamic Boost, and Bass Boost. FxSound presets load these values as a group, while EQ and effects are tools for refining the loaded result to suit your device and preferences.
Clarity: Check Vocal and Treble Definition
Clarity is an effect you can compare when the outlines of vocals and higher frequencies feel unclear. Vocal consonants or guitar lines may feel more distinct, but on bright earphones, sibilance and sharpness may increase first.
Before raising Clarity, check whether the upper EQ bands are already high. If both areas become strong together, the sound may initially feel clear but cause more fatigue during longer listening sessions. Start with a small change.
Ambience: Check Reverberation and Spaciousness
Ambience can be used to check a sense of space that feels as though reverberation and reflections have been added. It may widen sound that feels dry and narrow, but a high value can push the vocals farther away or blur the boundaries between instruments.
With calm songs, begin by comparing only a slight extension of the vocal endings and instrumental decay. If the recording already contains a lot of reverberation, reducing the added effect may produce a more natural sense of distance.
Surround Sound: Check Left-Right Width and Position
Surround Sound can affect the perceived width of the stereo image and the way space opens to the sides. It can be compared when left-right instrument placement feels cramped, but too much may weaken the center vocal or make its position feel unstable.
Even small changes may be immediately noticeable on headphones and closed-back earphones. Speakers are also affected by listening position and left-right spacing, so compare the effect on and off from the same seat before moving your position.
Dynamic Boost: Check Perceived Loudness and Dynamics
Dynamic Boost can affect the overall sense of volume and the contrast between quieter and louder parts of a song. Quiet sounds may feel fuller, but when the perceived volume increases, it is easy to assume that other parts of the sound have also improved.
If the vocals and accompaniment move forward together and feel congested, lower this effect first. If the dynamics feel compressed or listening fatigue increases over time, match the perceived volume and compare again before changing more EQ bands.
Bass Boost: Check Bass Quantity and Resonance
Bass Boost can be used when you want to add more bass quantity and resonance. It may help when the kick and bass lack weight, but on devices with a strong 125 to 250 Hz range, even the vocals may sound thick and muddy.
Lower the value if small speakers vibrate more without producing deeper bass, or if closed-back earphones create a sense of pressure. It is better to judge bass by whether the beginning of the kick and the movement of the bass notes remain distinct rather than by quantity alone.
FxSound Preset Directions by Music Genre
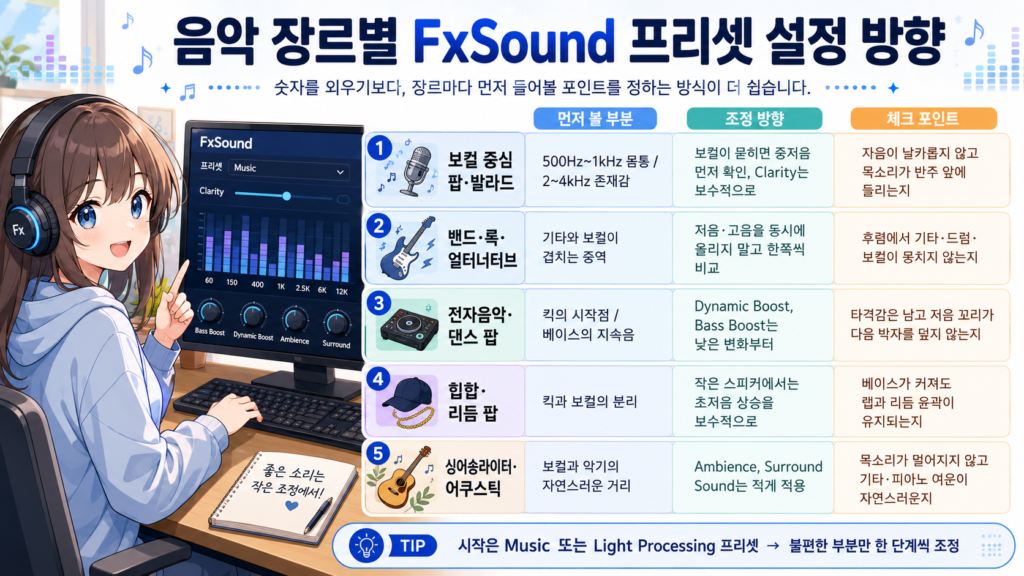
Rather than memorizing numbers, a practical way to adjust settings by genre is to decide which element of the song to check first. Start with Music or Light Processing, listen to the main points in the table below, and adjust the related EQ or effect one step at a time only when something feels uncomfortable.
| Music Type | What to Check First | Adjustment direction | Test Point |
|---|---|---|---|
| Vocal-focused pop and ballads | The body around 500 Hz to 1 kHz and presence around 2 to 4 kHz | When vocals are buried, check the low-mid range first and adjust Clarity conservatively. | Check whether the voice sits in front of the accompaniment without sharp consonants. |
| Band, rock, and alternative | The midrange where guitars and vocals overlap | After applying an FxSound preset, compare bass and treble separately instead of raising both at once. | Check whether the guitars, drums, and vocals become one congested mass during the chorus. |
| Electronic music and dance pop | The initial impact of the kick and the sustained bass | Check Dynamic Boost and Bass Boost with small changes first. | Check whether the impact remains while the bass tail does not cover the next beat. |
| Hip-hop and rhythm pop | Separation between the kick and vocals rather than bass quantity alone | Apply sub-bass boosts conservatively on small speakers. | Check whether the outlines of the rap and rhythm remain clear even when the bass becomes larger. |
| Singer-songwriter and acoustic music | The natural distance between vocals and instruments | Use little Ambience and Surround Sound to preserve the original space. | Check whether the voice stays close enough and the decay of the guitar or piano remains natural. |
Vocal-focused pop and ballads
If the vocals sound quiet, raising the treble first may only increase sibilance. Check whether the thickness around 125 to 250 Hz is covering the voice, then listen to the body around 500 Hz to 1 kHz and the presence around 2 to 4 kHz in order.
Use Clarity as a supporting tool for checking the outline of the voice. If consonants begin to feel piercing, reverse the change. For more detailed vocal adjustments, you can also read 4 Steps to Configure FxSound for Clearer Voice Quality.
Band, rock, and alternative
In band music, guitars, vocals, and snares often gather in the midrange. Raising both bass and treble heavily can make the sound more dramatic while pushing the center vocal backward, so check instrument separation in the chorus first.
Even if the bass quantity feels small, you do not need to add more if the bass notes and kick remain distinct. If the treble feels dull, move only one of Clarity or the upper EQ bands and listen for whether the rough guitar texture becomes excessive.
Electronic music and dance pop
In dance pop, the first impact of the kick and the movement into the bass are important. Raising Dynamic Boost and Bass Boost together may initially add power, but it can fill the gaps between beats and make the rhythm sound dull. Compare one item at a time.
You can view 31 to 63 Hz as the area for deep rumble and 125 to 250 Hz as the area for bass thickness. On small speakers, reducing low-mid congestion can sometimes make the rhythm clearer than raising the lowest bands.
Hip-hop and rhythm pop
In hip-hop, it is important not only how much bass there is, but also whether the rap and kick hide each other. If the first syllable of the vocal becomes unclear after the bass grows, reduce Bass Boost or the 125 to 250 Hz range slightly.
Laptop speakers and small portable speakers may have difficulty reproducing sub-bass. Instead of continuing to raise the lowest bands, lower the volume slightly and first check whether vibration or distortion disappears.
Calm Singer-Songwriter and Acoustic Music
In acoustic music, the distance between vocals and instruments and the length of the reverberation strongly affect the mood. Too much Ambience or Surround Sound may initially sound wide, but it can push the voice farther away and blur subtle guitar details.
Try a gentle starting point such as Light Processing. Add only a little spatial effect when the instruments feel too close together. Small changes are easy to hear in quiet songs, so use a short section to check listening fatigue as well.
How to Compare FxSound Presets with Test Songs
The five songs below were newly selected to avoid overlapping with songs already used in Music Hanip articles. They are not intended as a general recommendation list, but as test examples for comparing how vocals, band separation, bass, treble, and spaciousness change with different settings.
Vocal Focus: Atarayo (あたらよ) – I Forget You, Who Became Silent in October (10月無口な君を忘れる)
This song is useful for comparing both quiet sections where the vocal sits in front and sections where the emotion grows. When adjusting Clarity, check whether the outline of the voice becomes naturally clearer without making breaths and consonants excessively sharp.
Band Separation: Official HIGE DANdism – Mixed Nuts
The vocals, piano, guitars, drums, and brass-like sounds overlap quickly, making this useful for checking instrument separation. Listen for whether the chorus becomes congested or the vocals move backward when the low-mid range and treble are raised together.
Bass and Rhythm: Lucky Kilimanjaro – Burning Friday Night
Use the steadily moving kick and bass to compare rhythmic bounce rather than bass quantity alone. When raising Bass Boost, check whether the impact remains and whether the bass resonance becomes long enough to cover the next beat.
Treble and Vocal Texture: CHANMINA (ちゃんみな) – BIJIN (美人)
The sections where powerful vocals and electronic sounds appear together are useful for checking the influence of Clarity and the upper EQ bands. Compare whether the vocal remains clear without unnecessarily emphasizing rough texture or sibilance.
Spaciousness and Bass Separation: King Gnu – Sakayume (逆夢)
The calm vocals and widely layered instrumental arrangement are useful for checking spatial effects. When adjusting Ambience and Surround Sound, listen for whether the left-right width and decay remain natural without making the center vocals and bass sound distant or blurred.
Instead of comparing all five songs at once, choose only one or two goals per day, such as vocals and bass or treble and spaciousness. Keep the same section and a similar perceived volume, then change EQ bands or effects one at a time. This makes the differences between settings easier to identify.
What to Check If an FxSound Preset Feels Uncomfortable

If the sound becomes strange after changing a setting, reverse the last value you changed instead of moving more controls. If you cannot remember what changed or several effects overlap, it is faster to return to the basic preset you selected first and start again.
When Vocals Are Buried
If vocals move behind the instruments, first check whether the bass thickness around 125 to 250 Hz is excessive. Then compare the vocal body around 500 Hz to 1 kHz and the presence around 2 to 4 kHz with small changes.
Too much spatial effect can also push the center vocal farther away. Lower Ambience and Surround Sound first. If the sound still feels muddy, then check Clarity or the midrange EQ.
When Bass Feels Muddy or Boomy
If the bass lingers and covers the next beat, lower Bass Boost and the 125 to 250 Hz range first. Speakers placed close to a wall may produce more bass even without changing the settings, so check their position as well.
For a more detailed step-by-step look at bass problems, read 5 FxSound Bass Adjustment Settings. Separating how resonance feels on earphones, headphones, and speakers makes adjustment easier.
When Treble Is Sharp or Sibilance Is Strong
If consonants and cymbals feel piercing, lower the volume slightly first and check Clarity and the 8 to 16 kHz range. Lowering 2 to 4 kHz heavily at the same time can also reduce vocal presence, so compare one band at a time.
The treble impression may also change if the ear tips do not fit or the headphones are positioned incorrectly. Before continuing to reduce the settings, check the fit and whether the music app’s own EQ is active at the same time.
When Spaciousness Feels Too Wide or Artificial
If the vocals do not stay fixed in the center and the instrument positions seem to float, lower Surround Sound first. If long reverberation blurs the rhythm of fast songs, compare Ambience with its original value as well.
Spatial effects may feel especially strong near the ears on closed-back earphones and headphones. If you are using a preset made for speakers, save a separate custom preset with reduced spatial effects.
When to Reset or Return to the Default Setting
Return to a basic setting if you changed several EQ bands and effects at once and can no longer identify the cause, or if distortion and fatigue have increased. After changing output devices, or when the screen or behavior changes following an app update, compare again instead of immediately finalizing the old custom values.
Settings created from screenshots of older versions may use menu names or positions that differ from the currently installed version. Rather than forcing yourself to find functions that do not appear on the current screen, use the official guide and the actual items in your installed version as the standard.
Who This Is Recommended For and When to Check the Basic Settings First
Using FxSound presets can suit people who often listen to music on a Windows PC and want light correction because earphones, headphones, and speakers sound noticeably different from one another. It can also be useful for people who want to separate their vocal, bass, and spaciousness standards by genre or save preferred values as device-specific custom presets.
Recommended For
This approach is suitable for people who find basic EQ difficult but want to find a musical starting point quickly. It also works well for people who prefer choosing a basic option and reducing one problem rather than memorizing many numbers.
If you alternate between earphones, headphones, and speakers on one PC, you can save separate custom presets for each device. It can also help beginners build the habit of comparing the same song before and after a setting change.
When to Check the Basic Settings Before Fine-Tuning
If there is no sound at all or only one side works, check the output device, cable, Bluetooth connection, and Windows volume mixer before adjusting EQ. If the music app’s own EQ and spatial audio are both active, turn off the overlapping effects and apply only FxSound.
Fine tonal adjustment is also not the first step when the volume is high enough to make the sound rough or a small speaker vibrate. Lower the playback volume, check the device condition, and restart from a basic preset. This makes it easier to judge which changes actually come from the settings.
Frequently Asked Questions
Do I Need to Make a Separate FxSound Preset for Every Genre?
You do not need to make a separate preset for every genre. Create purpose-based settings such as Vocal, Bass Cleanup, or Low Spatial Effect only when the songs you often hear show similar problems. This keeps the preset list from becoming unnecessarily complicated.
Should I Try Music or General First?
Compare the two settings with the same song at the same volume and choose the one that sounds more natural as your reference point. If both changes feel too strong, compare Light Processing and adjust only the uncomfortable part in a small range.
Are Clarity and Treble EQ the Same Function?
They should not be considered exactly the same. EQ directly raises or lowers a specific frequency range, while Clarity can affect vocal and treble definition more broadly. It is better not to raise both heavily at the same time.
Why Does the Bass Not Become Deeper Even After Raising Bass Boost?
A small speaker may not reproduce low frequencies sufficiently, or vibration from the room and desk may simply become stronger. Instead of continuing to raise the bass effect, check the volume and speaker position. Also compare whether reducing congestion around 125 to 250 Hz makes the rhythm clearer.
Do I Need to Readjust the Settings When I Change Devices?
It is better to check them again. Bass and spatial effects that felt balanced on closed-back headphones may sound muddy or rough on small speakers. Compare them with the same test song and save each version with a device-specific name.
What Is Most Important When Comparing the Sound Before and After a Setting Change?
Keep the same section of the same song and a similar perceived volume. A louder sound can feel clearer, so after raising Dynamic Boost or several EQ bands, reduce the volume difference and listen again.
Notes and References
The current FxSound official guide lists General, Music, Voice, Streaming Video, Gaming, Classic Processing, Light Processing, and Bass Boost as the basic presets. Preset names, screen layout, and menu positions may look different depending on the installed version and language setting, so it is best to check the actual screen in your installation.
The descriptions of Clarity, Ambience, Surround Sound, Dynamic Boost, and Bass Boost, as well as the EQ adjustment directions, are based on functions described in FxSound’s official guides and documentation. The same setting can sound different depending on the earphones, headphones, speakers, audio source, and playback volume, so compare one item at a time starting with small changes.
- FxSound Official Website
- FxSound Getting Started Guide
- FxSound Effects Guide
- FxSound EQ Guide
- Guide to Saving User Presets in FxSound
Conclusion: Use FxSound Presets as Reference Points

When choosing a preset, check five things in order: the change you want, the device you use, the music genre, the process of adjusting one item at a time, and saving the result as a custom preset. Instead of memorizing numbers first, listen for whether the vocals are buried, the bass is boomy, the treble is tiring, and the spaciousness sounds natural.
At first, one basic preset and one familiar test song are enough. Listen to the same section at a similar volume and adjust only the uncomfortable part with small changes. This makes it easier to judge and rebuild your own settings even when the device or music genre changes.